Battery switch on travel trailer function is crucial for managing your RV’s power. This guide breaks down how these switches work, from basic single switches to more complex setups. We’ll cover connecting and disconnecting batteries safely, troubleshooting common problems, and performing essential maintenance. Get ready to become a battery-power pro!
Understanding your travel trailer’s battery system is key to enjoying worry-free adventures. This guide provides a clear and concise explanation of battery switch functionality, including different types of switches, safe connection and disconnection procedures, troubleshooting tips, and essential maintenance practices. We’ll also explore the interaction between the battery switch and other electrical components in your RV.
Understanding Battery Switch Functionality in Travel Trailers
A battery switch is a crucial component in a travel trailer’s electrical system, allowing you to control the flow of power from your trailer’s batteries to various appliances and systems. Understanding how it works is essential for safe and efficient use of your RV. Properly managing your battery power ensures you’ll have lights, appliances, and other essential systems working when you need them.
The primary purpose of a battery switch is to isolate your house batteries from the rest of the electrical system when not in use. This prevents unwanted battery drain, which can lead to a dead battery and leave you stranded. It also helps protect your batteries from damage caused by over-discharge or reverse polarity. Additionally, many switches allow you to connect to shore power, or to combine the power from both your house batteries and your vehicle’s battery.
Types of Battery Switches
Several types of battery switches are available for travel trailers, each offering different levels of control and functionality. The most common are single, dual, and three-way switches. Choosing the right type depends on your specific needs and the complexity of your electrical system.
Battery Switch Operation
Operating a battery switch is generally straightforward, but it’s crucial to understand the positions and their implications. Improper operation can lead to electrical problems or even damage to your batteries or appliances. Always consult your specific switch’s instructions for precise operation.
- Identify the switch positions: Most switches have clearly marked positions, often including “Off,” “Battery,” “Both,” and “Shore.” Some switches may use different terminology.
- Turn the switch to the “Off” position: This completely disconnects your house batteries from the trailer’s electrical system, preventing any drain. This is the most important step to take when storing your trailer for an extended period.
- Connect to shore power (if applicable): If you’re connected to an external power source (like a campground hookup), you can usually switch to the “Shore” position to power your trailer directly from the shore power.
- Switch to “Battery” or “Both”: To use your house batteries, switch to the “Battery” position. If your switch has a “Both” position, this allows you to use both your house batteries and shore power simultaneously.
Comparison of Battery Switch Types
| Switch Type | Number of Batteries Controlled | Functionality | Benefits |
|---|---|---|---|
| Single Battery Switch | One | On/Off control of a single battery bank. | Simple, inexpensive. |
| Dual Battery Switch | Two | Independent control of two battery banks (e.g., house and starting batteries). Often includes a “combine” position. | Allows for separate control and management of multiple batteries, preventing deep discharge of one bank. |
| Three-Way Switch | Two or more | Control over multiple battery banks, with options to combine or isolate. Usually includes positions for shore power, battery 1, battery 2, and combined power. | Offers the most control and flexibility, ideal for complex systems with multiple battery banks. |
Connecting and Disconnecting Batteries
Connecting and disconnecting your travel trailer’s house battery is a crucial task for maintaining your electrical system and ensuring safe operation. Proper technique and attention to safety are paramount to prevent damage to your battery, your trailer’s electrical system, and yourself. This section details the correct procedure and emphasizes the importance of safety precautions.Connecting and disconnecting the house battery involves manipulating the battery switch and, in some cases, physically connecting or disconnecting battery cables.
Always remember that RV batteries contain corrosive acid and can produce explosive hydrogen gas.
Battery Terminal Identification
Correctly identifying the positive (+) and negative (-) terminals is the first step. The positive terminal is usually marked with a “+” symbol, often larger than the negative terminal, and may be painted red. The negative terminal is marked with a “-” symbol and is typically unpainted or black. If markings are unclear, consult your battery’s manual or a qualified technician.
Improper connection can lead to short circuits and potentially serious damage.
Connecting the House Battery
Before connecting, ensure the battery switch is in the “OFF” position. Locate the positive (+) and negative (-) terminals on both the battery and the trailer’s battery connection points. Using appropriately sized wrenches or battery terminals, securely connect the positive cable to the positive terminal and the negative cable to the negative terminal. Make sure the connections are tight to avoid any voltage drop or sparking.
Once connected, turn the battery switch to the “ON” position.
Disconnecting the House Battery, Battery switch on travel trailer function
To disconnect the battery, first turn the battery switch to the “OFF” position. This will cut power to the trailer’s electrical system. Then, carefully disconnect the negative (-) cable first from the battery terminal. This helps prevent accidental short circuits. Next, disconnect the positive (+) cable.
Always ensure the connections are completely disconnected to avoid any residual current flow.
Safety Precautions When Working with RV Batteries
Working with RV batteries requires caution. Always wear safety glasses to protect your eyes from splashes of battery acid. Ensure adequate ventilation as hydrogen gas is produced during battery operation and is highly flammable and explosive. Never smoke near batteries. Wear gloves to protect your hands from acid and corrosion.
If you are unsure about any step of the process, consult a qualified RV technician.
Potential Problems from Improper Battery Connection/Disconnection
Improper battery connection or disconnection can lead to several problems, including:
- Short circuits: This can cause sparks, overheating, and potentially a fire.
- Battery damage: Incorrect connections can damage the battery terminals and internal components, shortening its lifespan.
- Electrical system damage: Improper connections can damage the trailer’s electrical system, including wiring, fuses, and appliances.
- Personal injury: Battery acid burns and electrical shocks are potential hazards of improper handling.
- Explosive hydrogen gas buildup: Improper handling can lead to the buildup of flammable hydrogen gas, increasing the risk of explosion.
Troubleshooting Common Battery Switch Issues
RV battery switches, while simple in design, can be the source of significant frustration if they malfunction. Understanding the common problems and troubleshooting steps can save you time, money, and a lot of headaches on your next camping trip. This section will guide you through identifying and resolving typical issues.Troubleshooting a non-functioning or excessively draining battery switch involves a systematic approach.
Start with a visual inspection, followed by checks of wiring and connections, and finally, consider the possibility of a faulty switch itself.
Identifying Common Problems
Common problems with RV battery switches stem from corrosion, loose connections, faulty wiring, and the switch itself failing. Corrosion builds up on terminals, preventing good electrical contact. Loose connections, often caused by vibration during travel, lead to intermittent power or complete failure. Faulty wiring can be due to damage from rodents, wear and tear, or improper installation. Finally, the switch mechanism itself can wear out or become internally damaged over time.
A switch that’s consistently causing excessive battery drain might indicate an internal short circuit or a problem with the switch’s internal components.
Troubleshooting Steps for a Non-Functioning Battery Switch
If your battery switch isn’t working, the first step is a thorough visual inspection. Look for signs of corrosion on the terminals – a white, powdery substance or green discoloration. Clean these terminals using a wire brush and baking soda paste, followed by a thorough rinsing and drying. Next, check all wiring connections for tightness and damage. Look for any broken or frayed wires, paying close attention to where the wires connect to the switch and the batteries.
Tighten any loose connections. If you find any damaged wires, repair or replace them. If the switch still doesn’t function after these steps, the switch itself may be faulty and require replacement.
Troubleshooting Excessive Battery Drain
Excessive battery drain points to a problem within the switching mechanism or its connections. First, disconnect the batteries from the switch to prevent further drain while you troubleshoot. Then, carefully inspect the switch for any signs of overheating (discoloration or melting of the plastic housing). Next, use a multimeter to check for voltage drops across the switch terminals.
So, you’re prepping for your next adventure? Awesome! First things first: make sure you understand your travel trailer’s power. Check out this guide on the battery switch on travel trailer function to avoid any dead-battery surprises. Knowing this is crucial, especially if you’re planning on setting up an amazing audiophile travel setup – you don’t want your tunes cutting out mid-song! Proper power management is key for a smooth trip.
A significant voltage drop across a particular terminal suggests a problem with that connection or the switch itself. Finally, verify that the switch is properly turned off when not in use. Leaving the switch in the “on” position, even unintentionally, will lead to significant parasitic drain.
Visual Inspection for Damage
A visual inspection should encompass the entire switch and its connections. Look for:
- Corrosion: White, green, or blue powdery deposits on terminals and connections. This indicates a chemical reaction and poor conductivity.
- Loose Connections: Wires that are not securely fastened to the terminals. Gently tug on each wire to check its security.
- Damaged Wiring: Look for fraying, cuts, or any signs of rodent damage in the wires leading to and from the switch.
- Physical Damage: Cracks, burns, or melting of the plastic switch housing. This often indicates overheating due to a short circuit.
- Loose Switch Mechanism: Check if the switch itself feels loose or wobbly in its mounting. This could indicate a loose connection within the switch.
Remember, safety first! Always disconnect the battery before working on any electrical components in your RV.
Battery Switch Maintenance and Upkeep
Keeping your RV’s battery switch and batteries in top condition is crucial for reliable power. Regular maintenance prevents costly repairs and ensures you’re always ready for your next adventure. Neglecting this can lead to premature battery failure and frustrating breakdowns on the road.Regular maintenance extends the lifespan of both your battery switch and your batteries, saving you money in the long run.
A proactive approach minimizes downtime and maximizes your enjoyment of RVing.
Regular Maintenance Schedule
A simple maintenance schedule will help keep your system running smoothly. This includes both the battery switch and the batteries themselves. Consistent attention will pay off in the form of reliable power and a longer lifespan for your components.
- Monthly Inspection: Visually inspect battery terminals for corrosion and tightness. Check the battery switch for any signs of damage or looseness.
- Quarterly Cleaning: Clean battery terminals and connections using a wire brush and baking soda solution. Tighten terminal connections.
- Annual Inspection and Service: Perform a thorough inspection of the battery switch and batteries (detailed below). Consider professional service if you’re uncomfortable with any aspect of the maintenance.
Cleaning Battery Terminals and Connections
Corrosion on battery terminals is a common problem that can significantly reduce power and even damage your batteries. Regular cleaning is essential to prevent this.To clean your battery terminals, first disconnect the negative terminal. Then, use a wire brush to remove any corrosion from both the terminals and the connection points. A baking soda paste (baking soda mixed with water to create a thick paste) can help neutralize any acid buildup.
After cleaning, use a terminal protector to prevent future corrosion. Reconnect the negative terminal last.
Annual Battery Switch Inspection Checklist
An annual inspection is vital for identifying potential problems before they become major issues. This checklist will guide you through the key points to examine.
- Visual Inspection: Check for any signs of damage, such as cracks, loose wiring, or corrosion on the switch itself.
- Switch Operation: Test the switch in all positions (e.g., battery 1, battery 2, both, off) to ensure it’s functioning correctly.
- Connection Tightness: Verify that all connections to the switch are secure and tight.
- Cable Condition: Inspect the cables connected to the switch for any signs of wear, fraying, or damage.
- Battery Condition: Check the water levels in flooded lead-acid batteries (if applicable). Inspect for any signs of damage or leaks.
Tips for Extending Battery Lifespan
Taking proactive steps can significantly extend the life of your RV batteries and switch.
- Regular Charging: Keep your batteries fully charged whenever possible. Use a quality battery charger and avoid deep discharging.
- Proper Storage: When not in use for extended periods, store your batteries in a cool, dry place. Keep them charged to prevent sulfation.
- Equalization Charging: Periodic equalization charging can help maintain the balance between cells in your batteries.
- Prevent Overcharging: Ensure your charging system is properly regulated to prevent overcharging, which can damage your batteries.
- Use Battery Protectants: Applying a battery terminal protector after cleaning can help prevent future corrosion.
Battery Switch and Electrical System Integration: Battery Switch On Travel Trailer Function
Your travel trailer’s battery switch is the central control point for your 12-volt DC system, acting as a gatekeeper for power flow. Understanding how it interacts with other components is crucial for safe and efficient operation. This section will explain its role in managing power and its relationship with key electrical systems in your RV.The battery switch is the primary on/off switch for your house batteries.
When the switch is in the “on” position, it allows power from your batteries to flow to various components in your trailer, such as lights, water pumps, and refrigerators (if they run on 12V DC). The converter, a crucial part of your RV’s electrical system, transforms 12V DC from your batteries into 120V AC household power. The battery switch allows the converter to draw power from the batteries when shore power isn’t available.
Similarly, an inverter converts 12V DC to 120V AC, and also requires access to the battery power, controlled by the battery switch. If the switch is off, these components are essentially powerless, protecting your batteries from unwanted drain and preventing accidental short circuits.
Battery Switch Use in Various RV Setups
Different RV setups incorporate the battery switch in slightly different ways. In a basic setup with just house batteries and a converter, the switch simply controls power to the house system. However, systems with solar panels often include a charge controller that manages the power flow from the solar panels to the batteries. The battery switch still controls the power
So, you’re prepping for your next adventure in your travel trailer? First things first: understand your battery system! Check out this helpful guide on the battery switch on travel trailer function to avoid any unexpected power outages. Knowing this is crucial, especially if you’re also planning on setting up an awesome audiophile travel setup – you’ll want to make sure you have enough juice to power those sweet tunes on the road!
- from* the batteries to the house system, but the charge controller manages the power
- into* the batteries from the solar panels. This prevents the solar panels from potentially backfeeding power into the house system. Some more advanced setups might have multiple battery banks (e.g., one for house use and one for starting the tow vehicle), each with its own switch, allowing for independent control. These setups often require a more complex wiring configuration to ensure proper power management.
Battery Switch and Power Consumption Management
The battery switch plays a vital role in managing power consumption. By turning the switch off when the RV is not in use or when parked for extended periods, you prevent parasitic drain from appliances and electronics that might draw a small current even when turned off. This helps to conserve battery power and extend their lifespan. Think of it as the main power switch for your trailer’s house system; turning it off is like flipping off the main breaker in your home.
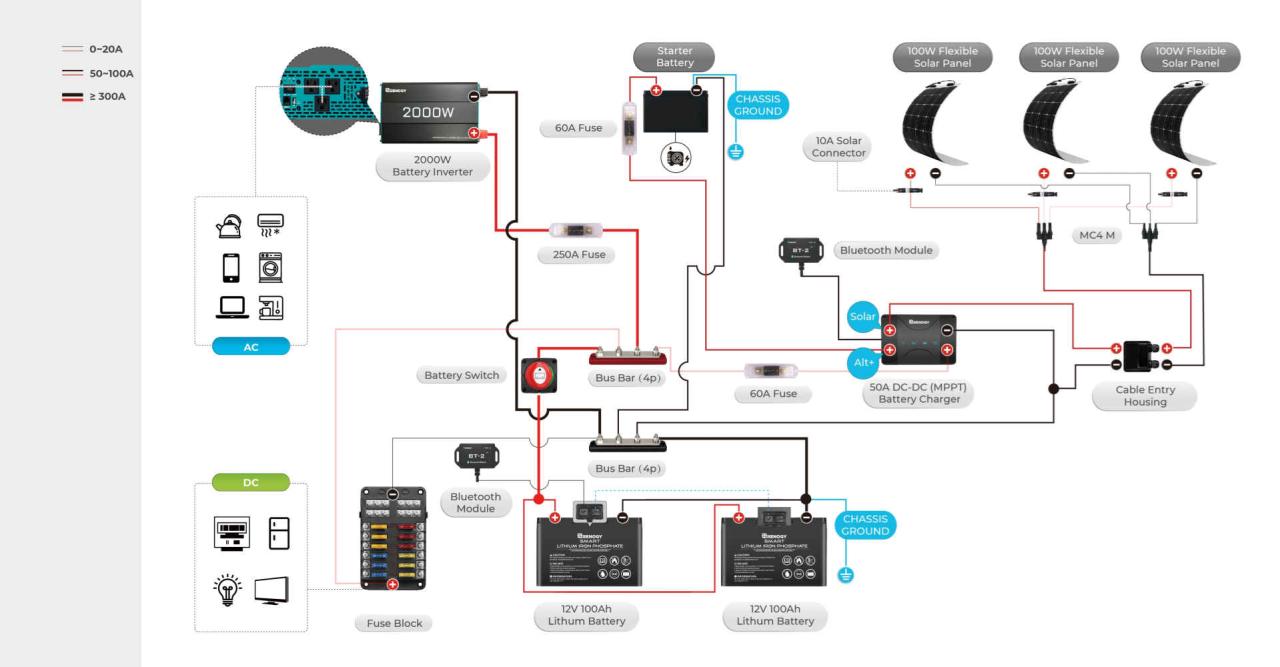
Typical Wiring Diagram of a Travel Trailer Electrical System
A typical diagram would show the house batteries connected to the battery switch. From the switch, wires would lead to the converter, the inverter, and the main distribution panel that feeds power to the various 12V DC appliances. A separate wire would run from the battery to the chassis ground. If solar panels are included, a wire would run from the solar panels to a charge controller, and then from the charge controller to the batteries. The charge controller would typically have its own on/off switch, separate from the main battery switch. The diagram would clearly show the flow of power and the role of each component in the system. Each component would have a fuse or circuit breaker for protection. Shore power would connect to the converter, bypassing the battery switch when shore power is available.
Safety Considerations with Battery Switches

Working with batteries, especially in a travel trailer where space is limited and potentially damp, requires a heightened awareness of safety. Improper use of the battery switch can lead to serious consequences, including electrical shocks, fires, and exposure to hazardous materials. Understanding and adhering to safety protocols is paramount.Improper use of the battery switch can create several hazards. Connecting the batteries incorrectly, for instance, can lead to a short circuit, resulting in sparks, heat generation, and potentially a fire.
Forgetting to switch off the batteries before performing maintenance can result in accidental shocks. Similarly, neglecting to properly secure the switch itself could lead to accidental activation or disconnection.
Battery Polarity
Understanding battery polarity is crucial for safe operation. Batteries have a positive (+) and a negative (-) terminal. Connecting the positive terminal to the negative terminal will create a short circuit, potentially damaging the batteries, the wiring, and even causing a fire. Always double-check the polarity before connecting or disconnecting any battery cables. Incorrect connection will immediately draw a large current and can create sparks and significant heat, potentially igniting nearby flammable materials.
Before making any connections, visually verify that the positive (+) and negative (-) cables are correctly connected to their respective terminals on both the battery and the switch.
Handling Battery Acid Spills
Sulfuric acid, the electrolyte in lead-acid batteries, is corrosive and can cause serious burns. If a spill occurs, immediately evacuate the area and allow it to air out before approaching. Neutralize the spill using baking soda (sodium bicarbonate), which will react with the acid to form a harmless salt and water. Always wear appropriate safety gear, including gloves, eye protection, and a respirator, when handling batteries.
Once neutralized, carefully clean up the spill with plenty of water and dispose of the neutralized mixture properly according to local regulations.
Overloading the Battery System
Overloading the battery system can lead to overheating, damage to the batteries, and potentially a fire. The battery switch plays a vital role in preventing overloading by allowing you to isolate circuits and control the power flow. Avoid connecting too many high-draw appliances simultaneously, exceeding the amperage capacity of your wiring and batteries. Regularly monitor your battery voltage to ensure you’re not drawing excessive power.
If you notice any signs of overheating, such as unusually warm batteries or wires, immediately turn off the power at the battery switch and investigate the cause. This proactive approach helps prevent significant damage and potential hazards.
Mastering your travel trailer’s battery switch isn’t just about keeping the lights on; it’s about ensuring safe and reliable power for all your onboard systems. By following the guidelines in this guide, you’ll be well-equipped to handle any battery-related situation, from routine maintenance to troubleshooting unexpected issues. Happy travels!
Expert Answers
What size battery do I need for my travel trailer?
The appropriate battery size depends on your trailer’s power demands. Check your owner’s manual for recommendations or consult an RV specialist.
How often should I check my battery terminals?
Inspect your battery terminals at least once a month for corrosion and tighten connections as needed.
What causes a battery switch to fail?
Common causes include corrosion, loose connections, faulty wiring, and overloading the system.
Can I use a different type of battery switch in my trailer?
Only use a battery switch that’s compatible with your trailer’s electrical system. Improper replacements can damage your system.
